
NDI® Framecode Signal Generator & Framecode Receiver/Analyser
Tools for testing workflows with NDI start & end points
ReadMe File
1) General features & FAQs for all ZEN NDI® utilities
Framecode Generator – Usage Notes
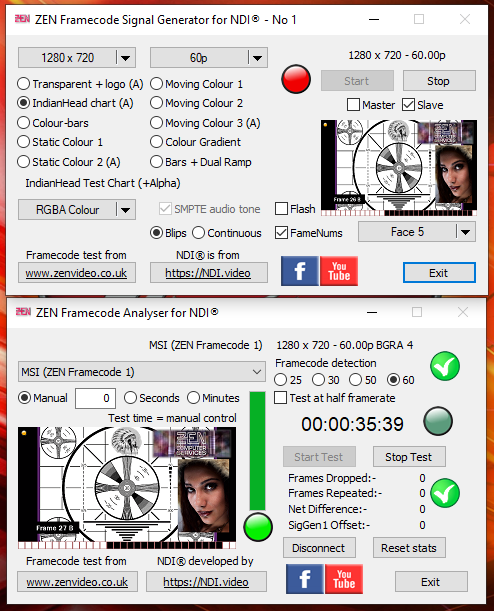
2a) The NDI® Framecode Signal Generator can create a variety of NDI test signals of different complexities (using the high-bandwidth NDI codec * ), both moving images and static frames, requiring differing amounts of bandwidth and therefore useful for stress-testing the LAN infrastructure.
* Why no NDI|HX? Because the Standard (free) NDI SDK only supports high-bandwidth NDI encoding. If you’re wondering why I haven’t used the Advanced SDK which supports NDI|HX encoding, I suggest you enquire about the cost of licensing it – that should give you the answer!
Framecode consists of a 32-element in-vision barcode along the bottom of frame which is easy to pass through other switching/decoding/encoding processes and can subsequently be read by software like the companion Receiver/Analyser application.
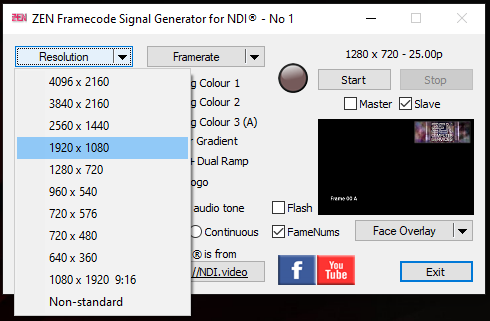
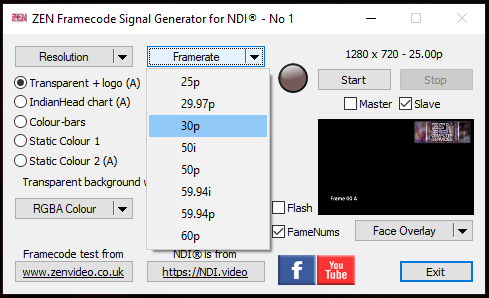
3a) The Resolution menu includes standard pixel dimensions from 640×360 up to 4096×2160 but can also generate other sizes via the “Non-standard” menu option. Available Framerates range from 25fps to 60fps, including the most commonly used interlaced framerates.
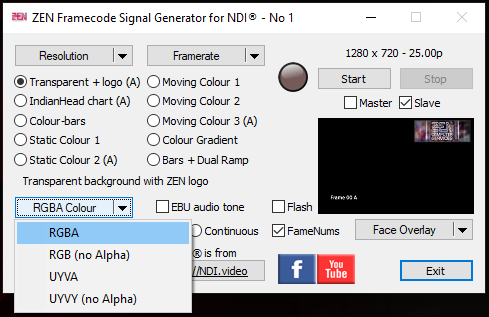
4a) Ten different video patterns are available, some static, some moving, some with an alpha channel (with an A suffix) and some without (or where opacity is always 100%).


5a) The selected pattern can be sent to the NDI encoding process (in the SDK) using different colour formats, either as RGB data or YUV data, with or without an alpha channel.
6a) Signal generation can be controlled by the “Start” & “Stop” buttons. The “Master” & “Slave” checkboxes can be used when multiple instances of the Signal Generator are running simultaneously (on the same PC). By setting one instance to Master and the rest to Slave, the Master Start/Stop buttons will control all the instances (so that they will run more or less in sync, although not actually locked together).
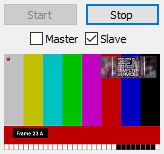
7a) The Video Preview window shows a thumbnail view of the signal output, but is disabled by default for most of the time. It auto-enables for a couple of seconds whenever the Signal Generator is started, but it can be toggled On/Off at any time by left-clicking on the display.
Note that when no NDI destinations have connected to the Signal Generator, the output framerate drops to a low level to save on CPU resources, so the framecode will appear to run slow, but it will resume at full speed as soon as a connection is made.


8a) Most test patterns have the option of adding a “Face Overlay” from the drop-down menu under the Video Preview. The reason for this is that we humans are very familiar with viewing other human faces, and can therefore easily spot visual imperfections (like compression artefacts) which might not be so obvious in other types of image content. When combined with a “complex” test pattern which stresses the NDI encoding algorithms, it becomes possible to see the limits of NDI in preserving image quality by closely viewing the face in the decoded video (as illustrated below, cropped from a 720p source and enlarged to 200%).


9a) Four-channel audio output can be added via the “audio tone” checkbox, in the form of single frame blips (on Frame zero) or as a continuous sinewave. The level is dependent on the frame rate, using the EBU reference level standard for PAL framerates, and the SMPTE standard for NTSC rates. EBU reference is at 0dBu, equal to -4dBVU (on the meters in the NDI Studio Monitor app), while the SMPTE reference is at +4dBu, equal to 0dBVU (on the Studio Monitor meters).
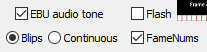
10a) The “Flash” checkbox enables a white box overlay (flash frame) every second (on Frame zero) , which will coincide with the audio blip if selected. Adding a flash frame adds to the signal complexity when testing LongGOP/high-compression variants of NDI, so testing with & without can reveal marked differences in image quality when using the earlier versions of NDI|HX.
The “FrameNums” checkbox adds a text overlay showing the current frame number – reset to zero every second (like the framecode itself).
The suffix A in the text overlay indicates that box 32 (far right) contains a parity bit for the main framecode display (boxes 1-29), used for framerates up to 30fps. Box 31 is not used in this mode.
Suffix B indicates that the alternative mode is being used (for framerates above 30fps) where boxes 1-29 each represent two successive frames and therefore only change every alternate frame, and box 31 indicates whether or not to add a frame to the value represented by boxes 1-29. Box 31 therefore toggles at full frame rate, whereas Box 32 toggles at half frame rate.
Version History
v1.0.0.0 From sometime in mid-2016. Created for internal testing. Occasional further development work has continued since then.
v1.3.0.34 31-Oct-2023. Initial public release using NDI® v5.6.
v1.3.2.37 11-Nov-2025 Recompiled to use the NDI v6.2 SDK

Framecode Receiver & Analyser
– Usage Notes
2b) The Framecode receiver is designed to read and analyse any NDI source containing a framecode overlay, detecting missing/repeated frames in the sequence. See here for an explanation of framecode.
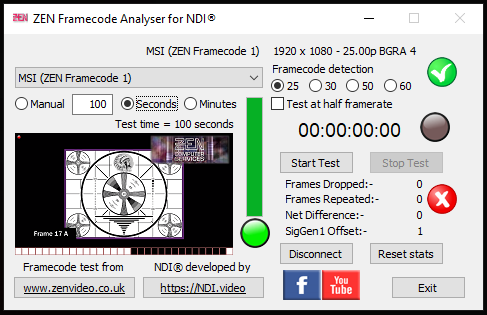
3b) The Video Preview window shows a thumbnail view of the received NDI source, but is disabled by default for most of the time. It auto-enables for a couple of seconds whenever a new NDI source has been selected, but it can be toggled On/Off at any time by left-clicking on the display.
The status line above the source-selector menu will confirm the NDI source name and display other information about the decoded NDI stream, namely the pixel resolution, frame rate, colour format and number of bytes per pixel (for which the options are typically BGRA-4 when an alpha channel is present, and UYVY-2 when there is no alpha).

The green-tick/red-cross symbol indicates whether framecode has been detected. You can only perform tests if the green tick is showing.
4b) Framecode analysis can be carried out at four frame rates, 25, 30, 50 or 60fps, selected via the four radio buttons. “Test at half framerate” is used when the framecode is only changing at half the rate of the NDI source. This can occur, for example, when a 30fps source is used within a 60fps production, or when the capture device limits the framerate by only capturing 30 frames per second from a 60fps source, but the NDI output is at 60fps.

When testing is performed, the duration can either be “Manual“, or a fixed duration can be set in “Seconds” or “Minutes” – useful for comparison tests.
5b) To the right of the Video Preview window is a display looking a little like an old-fashioned mercury-filled thermometer, comprising a vertical progress bar with an indicator light underneath it. The indicator light is normally green (for “good” framecode), but turns red whenever a dropped or repeated frame is detected. The progress bar gives a rough indication of how many consecutive frames have been correctly (or incorrectly) detected. A full height green bar indicates 100% sequential accuracy for recent frames, with lower levels showing as amber or red (for a high proportion of “bad” frames).
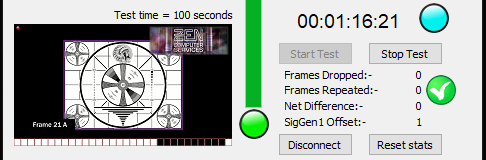
6b) When a test has been started, a numeric display shows the elapsed testing time in Hr:Min:Sec:Fr format, and to the right of that an indicator light will change colour every second.
7b) Underneath the timer display are the cumulative stats for total Frames Dropped & Frames Repeated, and the Net Difference between these two values (usually close to zero). The “SigGen 1 Offset” value is only relevant when the Receiver is testing a source originally generated by Framecode SigGen No 1, and both are running on the same PC. It provides a rough guide to the delay in frames between the source and the received signals, as might occur if the signal has passed through other software processing and/or a trip across the LAN.
8b) Although the stats will reset every time a new test is started, the “Reset Stats” button provides a quick method which typically is useful if testing in Manual mode and (maybe after making some changes upstream) you wish to restart the test.
9b) Finally, the Green-tick/Red-cross indicator next to the Dropped/Repeated stats will show as a Green tick every time a new test is started, but change and stay as a Red cross as soon as any error is detected, thus giving a quick visual indication of whether a test has been 100% error-free or not.
Version History
v1.0.0.0 From sometime in mid-2016. Created for internal testing work. Occasional further development work has continued since then.
v1.1.0.18 31-Oct-2023. Initial public release using NDI® v5.6.
v1.1.1.19 11-Nov-2025 Recompiled to use the NDI v6.2 SDK
FACEBOOK User Group
There is a support/discussion User Group page on Facebook – “ZEN’s Software Apps & Utilities for NDI” – just agree to the rules to join.
Martin Kay
ZEN Computer Services
www.zenvideo.co.uk
